Showing posts with label chocolate. Show all posts

Monday, January 13, 2014

Chocolate Chip Currant Low-carb Cookie Cake Thing

I decided to try to make a low-carb baked good that didn't taste like shit, or more specifically, weird spongy eggy shit. I tried a couple recipes that used just almond flour or coconut flour and they required so many eggs that eggs were all I could taste (and I hate eggs). I was searching the fancy-pants aisles at the grocery store and came across something called Low-Carb (or crab as I just type... hahahahaha low-crab baking!... heh) Baking Mix which had a bunch of different expensive ingredients mixed together.

I adapted a traditional choco-chip cookie recipe to incorporate the baking mix and xylitol, which is a sugar substitute that I actually think tastes good. It is made from birch trees (if you get the right brand, some are made from corn) and has a very low glycemic index which makes it better for diabetics.


I decided to include a little molasses since most cookie recipes call for brown sugar too, and I wanted to stick with the xylitol. I am not sure if it was necessary, but it made the batter look the right color.


I also went high on the salt to try to balance out the extra-sweet taste of the xylitol. I was a bit worried when I tasted the batter that it would be too sweet, but the finished product was definitely not overly sweet.


They didn't come out like cookies exactly, so much as like a dense cookie flavored cake, which all in all, I think is a win. The baking mix is very "whole grain" in flavor and texture, so it is kind of muffin-y in that sense. Still, I like it, and it is worth eating. Although the baking mix is expensive and so is the xylitol, so at some point it may be worth just making regular baked goods and eating smaller portions of them.

Post script... these are really growing on me. Two days later I am loving them! They are so different than anything else I have made, and the combo of chocolate and currants is just delightful.


Ingredients:
2 c Red Mill Low-Carb Baking Mix
1 tsp baking soda
2 tsp salt
1 c butter
1 c xylitol
1 tsp molasses
1 tsp vanilla
2 eggs
chocolate chips to taste
currants to taste

Preheat over to 375 degrees. Grease a large pan. Beat butter, sugar, molasses and vanilla in a large bowl, then beat in each egg. Gradually mix in baking mix, baking soda and salt. Stir in chocolate chips and currants. Spread into pan, bake 20 minutes.

Friday, August 30, 2013

Olive oil, chocolate and sea salt cookies

This was a super long summer because I overextended myself.  Sadly, the first thing to go when my time is limited is my baking.  I love to bake so I'm happy to report I'm back from my crazy summer with a fantastic cookie recipe.  I found this recipe via Capitol Hill Style and it's a keeper!  Soft and super chocolatey without being overly sweet, I ate like 4 when I was trying to figure out how to photograph chocolate cookies at 9pm in a kitchen with no natural light (not that it would've mattered after dark).  Shockingly, I didn't make any adjustments to the recipe though I'd like to throw out that the dough is weird.  Usually I eat about a cookie's worth of dough when I make them but something about the olive oil was a little off-putting.  The cookies are divine, the dough was weird.  Weird!


Olive oil, chocolate and sea salt cookies

Ingredients:

1/2 cup olive oil
1 cup granulated sugar
1 tsp vanilla extract
2 eggs
3/4 cup all purpose flour
3/4 cup cocoa powder
1 tsp baking soda
1 Tbsp hot water
1/2 tsp sea salt
2 cups semi-sweet chocolate chips
sea salt for sprinkling

Preheat oven to 350.  Dissolve baking soda into hot water.  Mix olive oil and sugar together in a medium to large mixing bowl.  Add the eggs one at a time, beating after each addition.  Add vanilla extract and mix well.  Add cocoa powder, flour and salt and mix well.  Mix in the baking soda and water mixture.  Mix in the chocolate chips.  Using a tablespoon scoop, scoop dough onto lined cookie sheet.  Sprinkle just a teeny bit of sea salt on top of your cookies.  Bake for 10 minutes.  Allow to cool for 5 or so before removing cookies from cookie sheet.  Devour with a glass of milk.

Monday, March 11, 2013

Fancy Filled Chocolates

Looking back over our posts so far I have noticed that Sarah has recipes... and I have jumbles of ingredients where the amounts don't actually matter. I swear I do cook things with recipes, I just haven't made a whole lot of those lately. And this one is no different!

Last Christmas I got a big idea to make fancy chocolates for everyone on my list. I had been buying expensive Christopher Elbow and other kinds of chocolates, which are fabulous but the fillings sometimes were weird, and I kept thinking up stuff that I thought sounded better. So I started a list of things like apple spice rum raisin, passion fruit praline and lime curd with toasted coconut. And you know what? They all turned out awesome!

This time I stuck with 2 fillings because I wasn't planning an array of gifts. I brought back one filling that I had done over Christmas, Nutella and caramel, which was a total hit. And I wanted to try something new, and I had some leftover ganache from the bark recipe that I wanted to spice up, so I went with lime chocolate ganache.

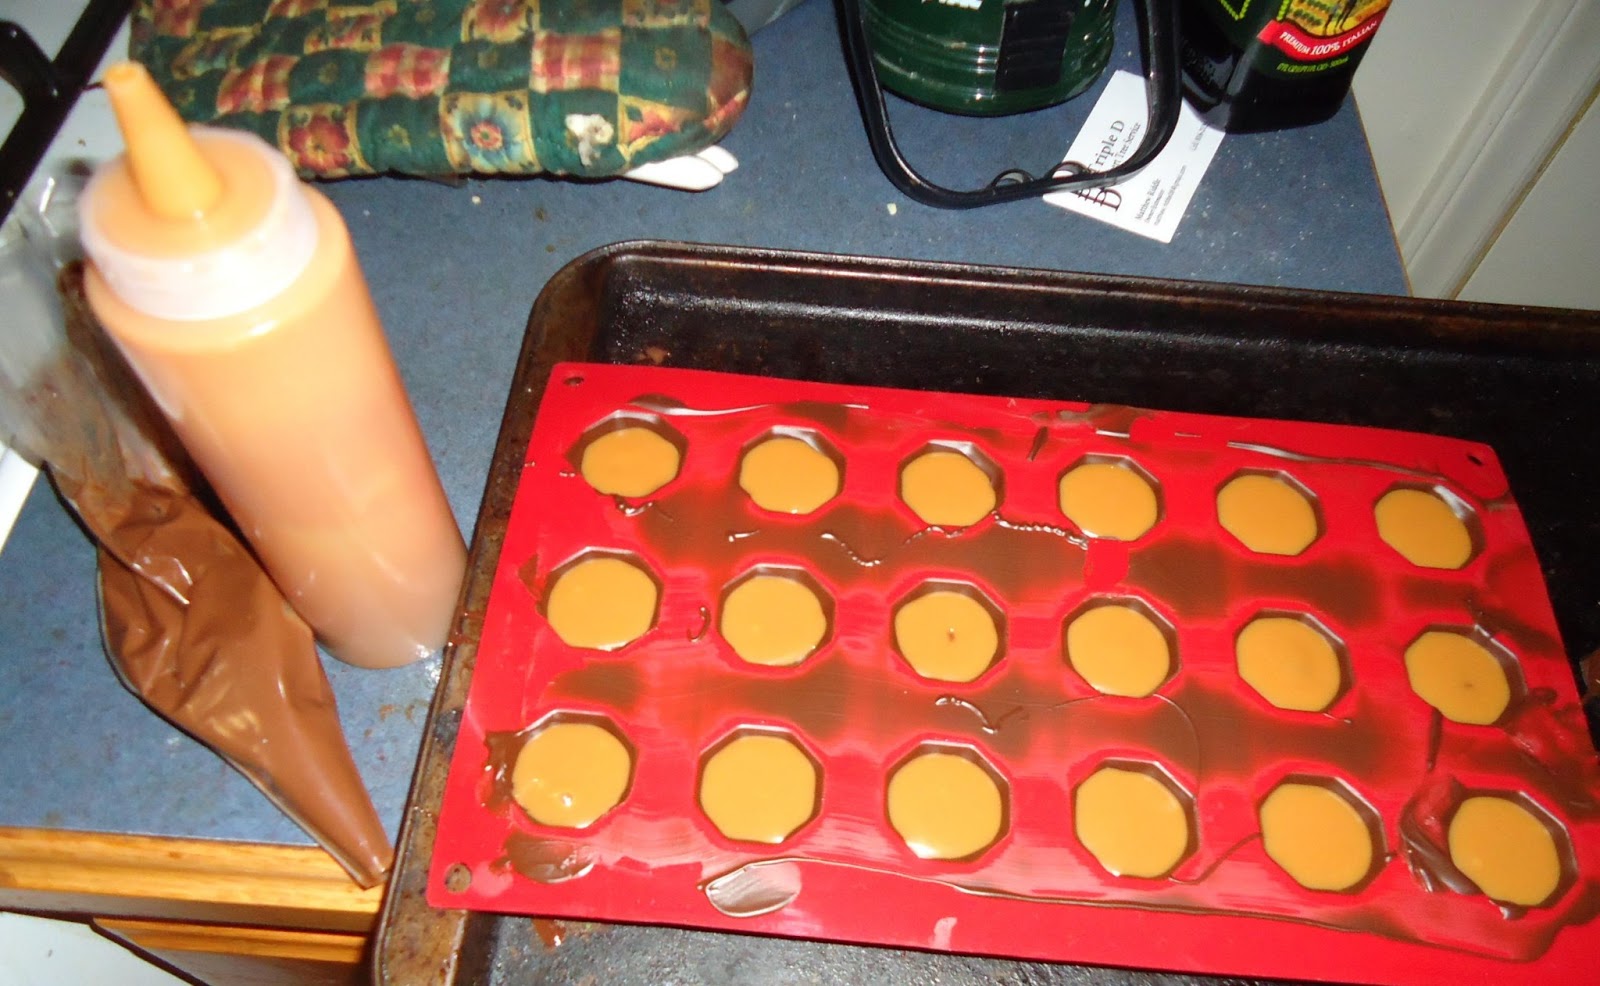
I had all of the fillings ready before I started melting the chocolate. I used Nutella straight from the can, and put it in an icing bag so I could pipe it into the molds easily. For the caramel, I used the old standby of melting some caramels with evaporated milk, but any caramel you like that is runny enough to pour or pipe would work.

The ganache was your standard dark chocolate and cream/milk, and then I reduced the zest and juice of 3 limes with a little sugar, and then stirred it in to the still warm ganache. The ganache started out really thick and firm. Surprisingly, the ganache smoothed out quite nicely in the microwave in 30 second increments.

Next comes melting the chocolate to pour into the mold. Thanks to Brian for getting me these awesome  silicone molds for Christmas! I have tried the cheap all-plastic ones, and they are ok, but I tended to crush the plastic in the process of removing the chocolates.


Tempering the chocolate is a good idea because it will give the chocolate a satisfying snap when it hardens. Here is a detailed set of tempering instructions. I was lazy this time and did my no-thermometer version, where I just heat the chocolate slightly hotter than melting point, cool it for a bit and then put it back on the heat. It worked just as well, so it seems the that exact temperatures aren't all that important. Of course, all of this is done with a make-shift double boiler because it will help you not burn the chocolate. Dark chocolate seems to be the easiest thing to work with, but milk and white chocolate are doable too.

There are lots of ways to get the chocolate into the mold... you can pour it all over and shake it out, paint it in very carefully, but I go with a sort of in-between method of spooning some into each well and then shaking it around and using a (very clean) finger or toothpick to make sure all of the edges are covered and then shaking the excess out. Then I use a metal scraper to scoop all of the excess chocolate off the top of the mold. I find it to be a nice balance of making a giant mess while still being detail-oriented.


After coating the molds with chocolate I stick them in the freezer for about 10-15 minutes so they harden up nicely and are ready for the filling. Keep an eye on your melting chocolate, or take it off the boiler while you wait so it doesn't burn. Once hard, you can pipe, pour, funnel, spoon, smoosh, etc. your filling into the coated molds. I piped the Nutella, used a squeeze bottle for the caramel, and spooned in the ganache and they all worked just fine. Make sure your fillings are level-ish, and slightly below the threshold of the mold so that you have room to cover the bottom of the chocolates. I found the scraper was great for spreading the chocolate over the mold so they have flat bottoms (preferred in this case).

After everything is assembled, stick them back in the freezer or fridge to finish setting them up. The silicone molds made it super-easy to unmold the chocolates because the mold just turned inside out and dropped the chocolates right out! I didn't have to bang them on the table and whack them with kitchen appliances to free them like with the plastic molds.


I mixed in some white chocolate at one point to get that marbled effect, but it is hard to keep consistent because everything just starts turning medium brown after a while. Whatever the color, I haven't hit a bad one yet, chocolate with fun filling is always a crowd-pleaser.

Two things though, plan on making a huge mess of your kitchen, your hands and your clothes, and plan on spending several to many hours depending on the number of trays and different fillings, because even on take-two, I spent 5 hours! I recommend getting creative with the fillings, I feel like that is the most fun part. Next time... maybe squid and mustard!

Saturday, March 2, 2013

Everything Bark

I had a bunch of different kinds of chocolate lying around so I decided on a cleaning-out-the-cabinets dessert. What better than chocolate bark which can literally consist of anything! Here is what I had in the house:

Dark chocolate
Milk chocolate
White chocolate
Slivered almonds
Chopped walnuts
Pretzels
Cornflakes
Rice crispies
Craisins
Golden raisins
Malted milk balls (not pictured)

I plumped the raisins and craisins in hot water first. Then I melted the chocolate. Usually I will use a double boiler, but I was feeling a little lazy so this time I just threw all of the chocolate together in a pot and heated it on low. I haven't had a problem doing it this way, but you have to keep a close eye. After the chocolate was mostly melted, I dumped everything else in and stirred it all up, then dumped it out on a baking sheet when it was all coated. I left a little of the white chocolate out and melted it at the end to drizzle on the top.


Put it in the fridge or freezer until it sets up and then chop it up into little hand-held blocks of goodness.


Really, this is a no-lose recipe. As long as you are putting good stuff in, you will get good stuff out. Just don't burn the chocolate. Also, don't try to make ganache, it gets too thick for stirring stuff into, just stick with straight up chocolate.

Thursday, February 28, 2013

Chocolate-swirled Banana Bread

I have a bi-monthly meeting with some colleagues that I always look forward to.  I decided that I wanted to bring a baked treat for them this week and as I looked around the kitchen, I noticed a couple of ripe bananas.  I like my bananas a little bit green so I sometimes have a hard time deciding when they're ripe enough to bake with but I hit the sweet spot with this recipe.  The bread comes out super moist and delicious and the chocolate swirl adds a little extra oomph.  I highly recommend it.


Ingredients:

1 1/2 cups flour
3/4 tsp baking soda
1/4 tsp baking powder
1/2 tsp salt
5 tbsp cocoa-almond spread
1 tbsp plus 1 tsp coconut oil
2 tbsp canola oil
3 tbsp butter, softened
1/2 cup packed brown sugar
2 medium ripe bananas, mashed
2 eggs
1/2 tsp vanilla extract
2/3 cup vanilla yogurt

Preheat the oven to 350.  Spray a loaf pan with Pam.
Mix the flour, baking soda, baking powder and salt in a bowl and set aside.
Put the cocoa spread and 1 tsp of coconut oil in a microwave-safe bowl and heat for 30 seconds.  Stir to combine.  It didn't look like it was going to come together but if you keep stirring, it will magically blend.
Mix the remaining coconut oil, canola oil, butter and brown sugar together.  Stir in the bananas.  Mix the eggs in one at a time, blending completely each time.  Mix in vanilla extract. Add yogurt and half the flour mix and stir well.  Mix in the rest of the flour blend, only until it's just incorporated.
Pour half the batter into the loaf pan.  Pour in all the chocolate mix and spread gently to ensure full coverage. Pour the rest of the batter on top and use a chopstick to swirl.
Bake for 45 minutes or until a toothpick comes out clean.

Adapted from Sweet Pea's Kitchen

Friday, February 15, 2013

Valentine's Brownies

For our late Valentine's, I decided to make something that combines 2 of Si Khadir's favorite things: caramel and chocolate. Because I am a slave to the holiday, I also decided it needed to be heart-shaped. I went back and forth deciding how to make it heart-shaped... should I cut it out from a larger pan, should I try to find a mold, should I just take bites out of a cupcake until it looks like a heart... I settled on silicon heart baking cups.


I just used a chocolate chunk brownie mix, so that wasn't particularly interesting. It took about 35 minutes to bake them in the cups.


Then I melted a bag of caramels in a pot with 1/3 to 1/2 a cup of evaporated milk (however much is in one of the tiny cans). I put it in a plastic squeeze bottle and then squished it into several places in each brownie-cupcake.


I made WAAAY too much caramel sauce so I am definitely going to need some more ideas for uses, I am thinking ice cream. The caramel didn't really create a central chamber in the brownies as I had hoped, I think because the brownies are so thick, so I just created little caramel columns.

Then I made icing out of about a tablespoon of butter, a tablespoon or 2 of water, 1/2 cup of white chocolate chips, and about 1/2 cup of powdered sugar. Just melt everything together and then add the powdered sugar and stir like crazy. You can change ratios to make it thicker or thinner.

I had some trouble taking the brownies out of the cups, they don't stretch quite as nicely as the paper cups. The smaller brownies came out ok, but I left the bigger ones in the cups because they were just falling apart. I poured the icing over the brownies and let it set a bit before piping little red hearts on them... how cute! (hooooorrrrkkkk)

Then I made a terribly sappy little display for when Si comes home tonight:


Yes, everyone, try not to barf and laugh at the same time. I haven't actually tasted anything yet, so I suppose there will be a follow up!

UPDATE!
The brownies were pretty darn good, but the outsides got a bit crustier than expected, I assume because they were baked individually so they all had the crusty edge. I think cake would have been better with this combo, but it's brownies, caramel and icing so it can't be that bad. This is definitely my favorite kind of icing though... keep your butter cream to yourself, I like icing that sets up hard.

Also, that damn red ribbon above left glitter all over my house. I hate you ribbon.